
Running Keras Models on Amazon SageMaker
- RobParkin
- Jun 7, 2018
- 8 min read
Updated: Oct 4, 2020
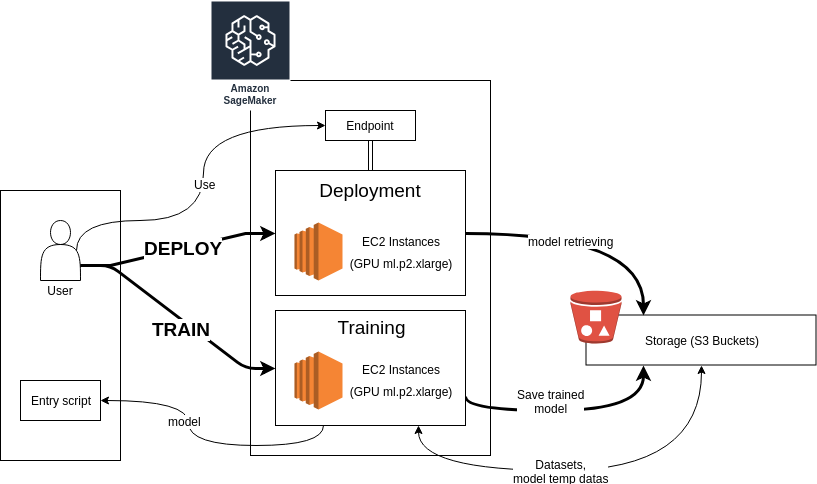
Amazon SageMaker is a service that provides data scientist with the tools necessary to build, train and deploy machine learning models in cloud. It tries to simplify the data scientist's work by enabling you to create workflows that cover the entire data science process from model creation to estimation and tuning to scoring deployment.
Amazon SageMaker provides many of the common toolsets for machine learning but this article will focus on creating deep learning models using Keras. Keras provides you with a high level abstraction for common deep learning artifacts. Keras models are primarily written in Tensorflow under the covers. SageMaker essentially implements a wrapper around TensorFlow which enables training, building, deployment and monitoring of these types of models.
The objective of this article is to show how to create and train a simple Keras model and run it using Sagemaker. We will use a simple CNN model to classify an image between two classes: cats or dogs.
Before we start, some useful details and links:
Amazon SageMaker: https://aws.amazon.com/sagemaker/
SageMaker Python SDK Documentation: https://sagemaker.readthedocs.io/en/stable/
Amazon S3 (storage): https://aws.amazon.com/s3/
When playing with a new technology it is usually better to start by setting things up on a local machine. We will do this and then use the SageMaker’s Python SDK to send our work to AWS for processing. SageMaker also gives access to “Notebook Instances” which basically are Jupyter notebooks that can be used in the cloud.
For this example, we will write the code in python scripts and use S3 to store the model and the datasets.
The Python script
We are going to use SageMaker to do four basic things: create a model, train the model, evaluate the model and then serve it as a service. It needs a wrapper script that tells it how to execute those functions.
Let’s start with the model. The function must be named keras_model_fn and takes as arguments the hyperparameters (which you will have to provide later). If everything works, it will return the compiled Keras model.
from tensorflow.python.keras import Sequential
from tensorflow.python.keras.layers import Conv2D, MaxPooling2D, Dropout, Flatten, Dense
from tensorflow.python.training.rmsprop import RMSPropOptimizer

HEIGHT = 128
WIDTH = 128
DEPTH = 3
NUM_CLASSES = 2

def keras_model_fn(hyperparameters):
    model = Sequential()

    model.add(Conv2D(32, kernel_size=(3, 3), input_shape=(HEIGHT, WIDTH, DEPTH), activation="relu", name="inputs",
                     padding="same"))
    model.add(MaxPooling2D())
    model.add(Conv2D(32, kernel_size=(3, 3), activation="relu"))
    model.add(MaxPooling2D())
    model.add(Dropout(0.25))

    model.add(Conv2D(64, kernel_size=(3, 3), activation="relu", padding="same"))
    model.add(MaxPooling2D())
    model.add(Conv2D(64, kernel_size=(3, 3), activation="relu"))
    model.add(MaxPooling2D())
    model.add(Dropout(0.25))

    model.add(Conv2D(128, kernel_size=(3, 3), activation="relu", padding="same"))
    model.add(MaxPooling2D())
    model.add(Dropout(0.25))
    model.add(Flatten())

    model.add(Dense(256, activation="relu"))
    model.add(Dense(256, activation="relu"))
    model.add(Dropout(0.25))
    model.add(Dense(NUM_CLASSES, activation="softmax"))

    opt = RMSPropOptimizer(learning_rate=hyperparameters['learning_rate'], decay=hyperparameters['decay'])

    model.compile(loss='categorical_crossentropy', optimizer=opt, metrics=["accuracy"])
    return model
SageMaker will call this function to instantiate your model. In order to train, we obviously need to give it some data: the images and their labels. To do this, we create two functions named train_input_fn and eval_input_fn that take in the training data directory and the hyperparameters as arguments. In these functions you are just asked to give images and labels in a batch. The data directories will need to be specified later in the call. The serving_input_fn function is really just a placeholder for storing the input data and returning exported input.
import tensorflow as tf

INPUT_TENSOR_NAME = "inputs_input" # Watch out, it needs to match the name of the first layer + "_input"
BATCH_SIZE = 64

def serving_input_fn(hyperparameters):
    # Here we need a placeholder to store the inference case
    # the incoming images ...
    tensor = tf.placeholder(tf.float32, shape=[None, HEIGHT, WIDTH, DEPTH])
    inputs = {INPUT_TENSOR_NAME: tensor}
    return tf.estimator.export.ServingInputReceiver(inputs, inputs)


def train_input_fn(training_dir, hyperparameters):
    return _input(tf.estimator.ModeKeys.TRAIN, batch_size=BATCH_SIZE, data_dir=training_dir)


def eval_input_fn(training_dir, hyperparameters):
    return _input(tf.estimator.ModeKeys.EVAL, batch_size=BATCH_SIZE, data_dir=training_dir)
Be careful, the first argument for both train_input_fn and eval_input_fn must be named “training_dir”. Because the task is the same in both cases, let’s wrap the content of these functions into one.
import os
from tensorflow.python.keras.preprocessing.image import ImageDataGenerator


def _input(mode, batch_size, data_dir):
    assert os.path.exists(data_dir), ("Unable to find images resources for input, are you sure you downloaded them ?")

    if mode == tf.estimator.ModeKeys.TRAIN:
        datagen = ImageDataGenerator(
            rescale=1. / 255,
            shear_range=0.2,
            zoom_range=0.2,
            horizontal_flip=True
        )
    else:
        datagen = ImageDataGenerator(rescale=1. / 255)

    generator = datagen.flow_from_directory(data_dir, target_size=(HEIGHT, WIDTH), batch_size=batch_size)
    images, labels = generator.next()

    return {INPUT_TENSOR_NAME: images}, labels
To make things easier, we use the ImageDataGenerator tool provided by Keras. With a data source, it creates a generator of new images that are modified and enhanced to make a richer dataset. For instance, we can zoom, flip, shear, crop, … our images, with a random factor (please see the documentation for more details: https://keras.io/preprocessing/image/).
We configure our generator to take its data from a directory (method flow_from_directory) given by SageMaker. This is actually an Amazon S3 Bucket where images are stored into as many directories as there are main tasks (e.g., training, testing). Inside each task directory, images are sorted using one directory per class (cat, dog). For our use case, this means the structure of our bucket will roughly be described as the image below:

This way the ImageDataGenerator will be able to understand how your data and classes are organized and will automatically generate matching (image, label) tuples. Following this method, the only thing left to do is format the data folder.
The ImageDataGenerator can take data from pickle files, pandas dataframes or several other formats.
All that remains now is to launch the training phase. But before that, we will quickly show you how to upload the data to S3.
Getting the data
Amazon S3 is the main storage service of Amazon Web Services. Data are organized into root folders called “buckets”. Once they are uploaded, they can be used by any other AWS service.
We are using a dataset of cats and dogs from a Microsoft sponsored Kaggle competition that took place in 2013. You can download it there: https://www.microsoft.com/en-us/download/details.aspx?id=54765. Once we have the data zip file, we need to write a python script to format it and transfer it up to Amazon S3. The dataset is made of approximately 25000 images. Because we do not need so many images and because we are uploading them one by one (as required by the ImageDataGenerator flow_from_directory), we are going to use only1000 images per class for training and 200 for evaluation.
import boto3
import os
import zipfile
from PIL import Image
from botocore.exceptions import ClientError

bucket_name = 'cats-n-dogs'

s3 = boto3.client('s3')
try:
    print("Checking bucket ...")
    s3.head_bucket(Bucket=bucket_name)
except ClientError as e:
    print("Bucket not existing, creating it ...")
    s3.create_bucket(Bucket=bucket_name, ACL="private", CreateBucketConfiguration={'LocationConstraint': 'EU'})

zip_dataset = "kagglecatsanddogs_3367a.zip"
tmp_dest = os.path.join(os.path.dirname(__file__), "tmp")
data_dir = os.path.join(os.path.dirname(__file__), "cats_n_dogs")

if not os.path.exists(tmp_dest):
    os.mkdir(tmp_dest)

if len(os.listdir(tmp_dest)) <= 0:
    print("Unzipping archive ...")
    with zipfile.ZipFile(zip_dataset, 'r') as zip_ref:
        zip_ref.extractall(tmp_dest)

# The archive contains a main folder named "PetImages" followed by two folders "Cat" and "Dog"
# We will take only ~ 1000 images for each class to stay light.

dog_dir = tmp_dest + "/PetImages/Dog"
cat_dir = tmp_dest + "/PetImages/Cat"

train_dir = data_dir + "/train/"
validation_dir = data_dir + "/validation/"

print("Checking directories ...")
for dir in [data_dir, train_dir, validation_dir]:
    if not os.path.exists(dir):
        os.mkdir(dir)


def move_and_check_files(origin, dest_train, dest_valid, quantity_train=1000, quantity_valid=200):
    moved = 0
    for file in os.listdir(origin):
        try:
            # Before moving the file we check if the image is readable
            im = Image.open(os.path.join(origin, file))
            im.verify()
            os.rename(
                os.path.join(origin, file),
                os.path.join(dest_train if moved < quantity_train else dest_valid, file)
            )
            moved += 1
        except Exception as e:
            print("Bad image : %s" % file)

        if moved >= quantity_train + quantity_valid:
            break

print("Organizing and checking files ...")
for category in [(cat_dir, 'cat'), (dog_dir, 'dog')]:
    train = train_dir + category[1]
    valid = validation_dir + category[1]
    os.mkdir(train)
    os.mkdir(valid)
    move_and_check_files(category[0], train, valid)

print("Done !")
We now have the data structured the way we want it and it is ready to be uploaded to S3. To do this, we just need to create a bucket and send everything on it. We are using AWS’s CLI, but you can also do it from the Python API. One caveat there is that the API requires you to load each file separately which can be tedious. The CLI provides a recursive option for directories which makes things easier.
# You can create the bucket from the CLI with this command
aws s3api create-bucket --bucket cats-n-dogs --acl public read --region eu-west-1

# Then send your data to S3
aws s3 cp ./cats_n_dogs s3://cats-n-dogs/data --recursive
Now the bucket contains the dataset and everything is ready for training !
Training the model
SageMaker has a built-in wrapper for Tensorflow training and evaluation jobs. The wrapper will start an Estimator job. This is the main object for instantiating a learning sequence in SageMaker for any framework. This job will then launch the entire workflow for model training. The script below instantiates the session, defines the location of the data and the type of clusters to use, loads our previous script to estimate the model and finally runs the estimation.
import os
import sagemaker
import numpy as np
from sagemaker.tensorflow import TensorFlow
from tensorflow.python.keras.preprocessing.image import load_img

ON_SAGEMAKER_NOTEBOOK = False

sagemaker_session = sagemaker.Session()
if ON_SAGEMAKER_NOTEBOOK:
    role = sagemaker.get_execution_role()
else:
    role = "[YOUR ROLE]"

bucket = "cats-n-dogs"
key = "data"                            # Path to the dataset

train_instance_type='ml.p2.xlarge'      # The type of EC2 instance for training

deploy_instance_type='ml.p2.xlarge'     # The type of EC2 instance which will be used for deployment

hyperparameters={
    "learning_rate": 1e-4,
    "decay": 1e-6
}

train_input_path = "s3://{}/{}/train/".format(bucket, key)
validation_input_path = "s3://{}/{}/validation/".format(bucket, key)

estimator = TensorFlow(
  entry_point=os.path.join(os.path.dirname(__file__), "cats_n_dogs.py"),    # Your entry script
  role=role,
  framework_version="1.12.0", # TensorFlow's version
  hyperparameters=hyperparameters,
  training_steps=1000,
  evaluation_steps=100,
  train_instance_count=1, # "The number of GPUs instances to use"
  train_instance_type=train_instance_type,
)

print("Training ...")
estimator.fit({'training': train_input_path, 'eval': validation_input_path})
Once this is running, you can see the training job's progress in Training tab in SageMaker’s console. SageMaker will automatically create a new temporary S3 Bucket where it will store checkpoints during training and export model and weights to once finished. The name of the bucket will be printed in the console output (in our case, the local console output). You can also access it in the S3 Console.
Once the training is done, it will be automatically registered as a model in SageMaker and will be available under the “inference” tab in the console. Now that the model is trained, the last remaining step is to set up the service to serve it for predictions.
Deploying your model
The final step is pretty straightforward. We just need to tell the estimator to run the model in our deploy environment. The system will provide it with a reference to the service endpoint.
deploy_instance_type = 'ml.p2.xlarge'
predictor = estimator.deploy(initial_instance_count=1, instance_type=deploy_instance_type)
Now we just need to use the predictor object to access the endpoint and send requests. Amazon recommends using the client SDK for this since it simplifies the interface for exchanging data with the endpoint.
We can now test our endpoint by sending a simple cat image from our database (one that was not from the training).
import numpy as np
from tensorflow.python.keras.preprocessing.image import load_img

cat_image = load_img("[YOUR_FOLDER]/cat/2282.jpg", target_size=(128, 128))
cat_image_array = np.array(cat_image).reshape((1, 128, 128, 3))
print(predictor.predict({'inputs_input': cat_image_array}))

# Output :
#  {'outputs':
#   {'dense_2':
#    {'dtype': 1,
#     'tensor_shape': {'dim': [{'size': 1}, {'size': 2}]},
#     'float_val': [1.0, 0.0]
#    }
#   },
#   'model_spec': {'name': 'generic_model', 'version': {'value': 1546513612}, 'signature_name': 'serving_default'}
#  }

sagemaker.Session().delete_endpoint(predictor.endpoint)
The results are stored into a JSON file with the last layer’s name. Because we did not give a special name, it has been generated as “dense_2”. The “float_val” field gives the result which indicates that the image we gave is a cat with 100% certainty. Remember that the labels and classes associations were generated by the ImageDataGenerator based on the ordering of the folders. In our case, the first folder was “cat”; the second was “dog”.
When the endpoint is not needed anymore, it can be removed manually using SageMaker’s web interface or with the Python SDK using the “delete_endpoint” method.
Conclusion
We walked through a very simple example of how to create, train and deploy a Keras model on AWS using SageMaker. Here we used a fairly straightforward CNN to just do inference on a single input. There are other more complicated patterns available that are documented in the SageMaker examples.


Comments